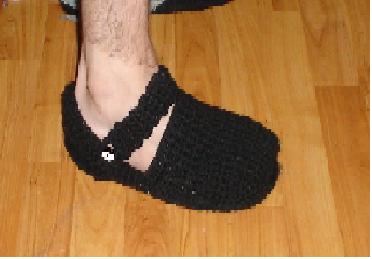
ORIENTAL STYLE SLIPPERS This is my own original pattern
This pattern fits a mans size 11, as I made these for my son. Adjust the pattern accordingly for the size that you need.
MATERIALS
Small amount of yarn, color of your choice
size H crochet hook
two pieces of plastic canvas - cut to fit the sole of your slipper
two pieces of quilt batting - cut to fit the size of your slipper
Two buttons of your choice - I used ying yang buttons
Coordinating shade of puffy paint - optional.
SOLE - make 4
ROW 1: Chain 4, SC (single crochet) in second chain from hook and across. Chain 1, turn. 3 SC made.
ROW 2: 2 SC in first stitch, 1 SC in each stitch across to last stitch. 2 SC in last stitch. Chain 1, turn. 5 SC made.
ROW 3: Repeat row 2. Chain 1, turn. 7 SC made.
ROW 4-: Repeat row 2. Chain 1, turn. 9 SC made.
ROWS 5-10: 1 SC in each stitch across. Chain 1, turn. 9 SC made.
ROW 11: SC decrease in first two stitches. SC in each stitch across to last two stitches. SC decrease last two stitches.
Chain 1, turn. 7 SC made.
ROWS 12-16: SC in each stitch across. Chain 1, turn. 7 SC made.
ROW 17: SC decrease in first two stitches. SC in each stitch across to last two stitches. SC decrease in last two stitches.
Chain 1, turn. 5 SC made.
ROW 18: SC decrease in first two stitches. SC in each stitch across to last two stitches. SC decresae in last two stitches.
Chain 1, turn. 3 SC made.
ROWS 19-21: Now we are working around the ENTIRE sole. SC in each stitch around the entire sole, using a marker in your
last stitch so you'll know when the new row starts. This is because these weren't quite large enough for my son's foot, and
I needed to make them larger. If you need a smaller size you may not need to do these 3 rows. At the end of the third row,
join with a slip stitch and fasten off.
Now, to put the soles together. Cut a 2 pieces of plastic canvas and 2 pieces of quilt batting to fit just inside the soles
of your slippers. Sandwich one piece of plastic canvas and one piece of the batting in between two of the soles that you've
just made and slip stitch the two soles together. The plastic canvas side is the bottom, or outside, of your sole and the
quilt batting side is the top, or inside, of your sole. The plastic canvas stiffens them up a little, and the quilt batting
is just for comfort.
TOE - make 2
ROW 1: Chain 11.SC in second chain from hook and each chain across. Chain 1, turn. 10 SC made.
ROW 2: 2 SC in first stitch, SC in each stitch across to last stitch, 2 SC in last stitch. Chain 1, turn. 12 SC made.
ROWS 3-5: Repeat row 2. Chain 1, turn. (14 SC made), (16 SC made), (18 SC made).
ROWS 6-19: SC in each stitch across. Chain 1, turn. 18 SC made.
ROW 20: SC decrease in first two stitches. SC in each stitch across to last two stitches. SC decrease in last two stitches.
Chain 1, turn. 16 SC made.
ROW 21: SC around this side of toe, top of toe, and opposite side of toe. STOP when you get to the bottom row and fasten
off, DO NOT SC across the bottom of toe.
HEEL - make 2
ROW 1: Chain 21, SC in second chain from hook and next 4 chains, HDC (half double crochet) in next 3 chains, DC (double
crochet) in next 4 chains, HDC in next 3 chains, SC in next five chains. Chain 1, turn. 20 stitches made.
ROWS 2-5: Repeat row 1. 20 stitches made. Fasten off.
Join toe to appropriate part of sole with slip stitches. Join heel to appropriate part of the sole with slip stitches.
STRAP - make 2
ROW 1: Chain 26, single crochet in second chain from hook and each chain across. Chain 1, turn. 25 SC made.
ROWS 2-3: SC in each stitch across. Chain 1, turn. 25 SC made.
ROW 4: SC in each stitch across. At end of row, chain 3 for loop, SC in end of first row to attach loop. Fasten off.
Slip stitch strap to one side of heel portion of slipper, and attach button to the other side of the heel. You can go back
and make more loops on the inside of the strap for adjusting the size if necessary.